
The Cuisinart ICE-100 [Amazon] ice cream maker is the most recent compressor machine from the kings of domestic ice cream kitchen appliances!
It's the only ice cream maker that comes with 2 paddles: 1 for ice cream and another for sorbet and gelato. But otherwise it's a very simple machine with very few features.
The question is: do the two paddles make the Cuisinart ICE-100 worth buying over other ice cream makers? Read on and find out.

Cuisinart ICE-100 Specs | |
|---|---|
Width: | 12" |
Height: | 9.5" |
Depth: | 17" |
Weight: | 32 lb |
Loudness: | 71 Db |
Paddle Rpm: | 25 |
Overrun: | 19-36% |
Warranty: | 3/5 year |
Manual: | |
My Ratings |
|---|
Build Quality |
Usability |
Ice Cream Quality |
Value for money |
Overall |
Things I like and Things I don't |
|---|
In this review of the Cuisinart ICE-100, I'll also cover how it works, how best to use it to make frozen desserts, how well it actually makes ice cream, gelato (and the rest), and finally I'll suggest some alternatives just in case it isn't the best ice cream maker for you.
How does the Cuisinart ICE-100 work?
The Cuisinart ICE-100 is a "compressor ice cream maker". If you're not sure what this means, then I'll explain...
There are 3 distinct types of ice cream maker. And what makes each one different is the way they freeze the ice cream:
- with salt and ice
- with a removable bowl that you pre-chill in your freezer
- with a built in freezer (or compressor)
So the ICE-100 has it's own freezer (which is also known as a compressor) which freezes the ice cream and other desserts while it's also mixing them.
This type of ice cream maker is the most convenient you can buy. There's no need to plan ahead. When you want to eat ice cream, you just turn it on to pre-cool for 10 minutes, add your mixture and 30 minutes later you'll have ice cream!
However these machines are also bulky, a bit delicate and expensive. If you're not sure whether machines with compressors are the right type for you, check out my complete guide to finding the best ice cream maker.
The Build Quality of the Cuisinart ICE-100
The ICE-100 doesn't come with too many parts or accessories. In fact there's just 5 separate bits:
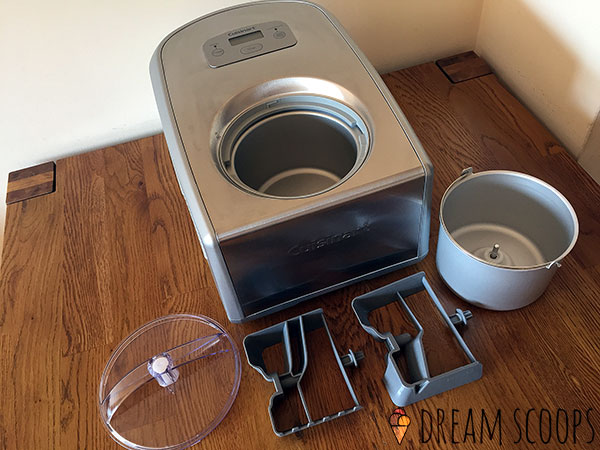
There are 5 parts to the Cuisinart ICE-100
- the body that contains the compressor, the motor and the control panel
- a removable bowl in which the ice cream is frozen
- a paddle (also known as a dasher) for ice cream and frozen yogurt
- a paddle for gelato and sorbet
- a transparent plastic lid
The body
The body of the ICE-100 is pretty bulky and weighs a fair bit too! It measures 12" wide, 16.73" deep and 9.33" high (30.5 x 42.5 x 24 cm). And it weighs 32 lb (14.5 kg). These numbers are pretty standard for a compressor ice cream maker.
But the electric cable is a little short, measuring just 37" (94 cm). This means you've got to place the machine pretty close to a power point if you don't want to use an extension cable.

The Cuisinart ICE-100 from the front
The ICE-100 features a very smart, brushed stainless steel housing that gives it a high quality finish. The Cuisinart logo is embossed on the front. Underneath at the front is a small recess to make carrying the machine easier. The two sides contain extensive cooling vents.

Lots of air vents on the sides of the Cuisinart ICE-100
About the vents: they're vital for keeping the machine cool so it's important that the're not obstructed. If they are, your ice cream may not freeze properly. So I'd recommend leaving at least 10 cm free space on either side of the machine.
On the top panel there's a big round cavity, with a metal gear at the bottom. Inside the body there's the compressor that cools the sides and the bottom of this cavity (to freeze the bowl that holds the ice cream) and a motor that turns the gear (to spin the mixing paddle).

The cooling chamber of the Cuisinart ICE-100
Behind this cavity is the control panel. It's very simple, featuring a small LCD display panel and just 3 buttons:
- Power button
- Start / Stop button
- Timer button

The very basic control panel of the Cuisinart ICE-100
Like I said, very simple. And the only information you'll see on the LCD display is the amount of time the machine has left to churn.
The removable bowl
The bowl that comes with the ICE-100 is a 1.5 quart (1.4 liter) capacity anodized aluminium bucket. It has a small drive shaft in the middle. (This is turned by the gear at the bottom of the body cavity. And will itself turn the paddle). And there's a thin metal handle to help you remove it from the main body.

The removable bowl of the Cuisinart ICE-100
Why does the ICE-100 bowl use a removable bowl? I think it's to make extracting the ice cream and cleaning the machine easier. Once you've removed the bowl from the ice cream maker, it's a lot easier to scrape out the finished desert. And then it's also very simple to wash the bowl in your sink.
However the bowl does provide an extra layer of insulation from the cooling compressor in the body. So machines with removable bowls won't freeze your ice cream as quickly as those without.
The bowl slides very tightly (but very smoothly into the cavity in the main body of the ICE-100. You need to make sure that the hinges of the handle on the bowl line up with the small gaps in the rim of the cavity. If you don't the lid won't go on properly!
The dasher
The dasher is just another name for the plastic paddle that mixes the ice cream. It has 2 very important jobs:
- Scraping frozen mixture off the sides of the bowl and moving it to the middle
- Adding air to the mixture
These 2 jobs are so important because they have a huge impact on the quality and the consistency of the final dessert.
The dasher's impact on the quality of the ice cream
Everyone wants smooth ice cream, right? It's an essential part of good quality ice cream. And ice cream science tells us that the faster we freeze ice cream, the smoother the final product will be.

The gap between the dasher blade and the bowl is really small: less than 1 mm...
One of the things that influences how fast the ice cream freezes is how close the blades of the dasher are to the sides of the bowl. On domestic machines there is always a small gap. Which means there will always be a thin layer of frozen mixture left on the sides, that the dasher can't scrape off. This layer insulates the rest of the mixture from the cooling effects of the compressor. Which means the rest of the mix will freeze slower.

... this means there's a less insulating ice left on the sides of the bowl to slow down freezing
So for faster freezing, smoother ice cream, the smaller the gap the better! And luckily, on the ICE-100 the gap is tiny: less than 1 mm. This is great as it should mean we get smoother ice cream from this machine.
The dasher's impact on the consistency of the ice cream
The amount of air that the dasher adds to the ice cream will effect how light or dense the final ice cream is. More air will give a lighter, fluffier consistency. Less air will give a heavier, denser consistency.
Generally speaking the faster the dasher rotates, the more air is added. But domestic ice cream makers generally rotate very slowly, so they all add very little air to the mixture and produce denser ice creams.
The ICE-100 dasher rotates at 25 rpm which is pretty slow, even for a domestic machine! But the shape of the dasher will also influence how much air it adds to the mixture.

2 dashers: on the left for gelato and sorbet, on the right for ice cream and yogurt
2 dashers: one for gelato and one for ice cream
The Cuisinart ICE-100 is unusual in that it comes with two different mixing paddles. One is for churning ice cream and frozen yogurt, which tend to contain more air. The other is for churning gelato and sorbet which should contain less air. The idea is that different shaped dashers will introduce different amounts of air into the mixtures while they're being churned. How well this works, we'll see in the "what's the ice cream like section"!
The lid
The lid that comes with the ICE-100 is a pretty standard, transparent plastic thing. There's no hatch for adding mix-ins without removing the lid.

You get a very simple plastic lid with the Cuisinart ICE-100
And I often have problems locking the lid in place! The idea's that you line up an arrow on the lid with an "unlocked" lock symbol on the body of the machine and then twist it towards a "locked" lock symbol. However often that doesn't actually lock the lid in place for me. I think you need to push the lid down a bit at the same time but for me, it's a bit hit and miss!
Final thoughts on Build Quality
The Cuisinart ICE-100 is a pretty rugged machine. It's big and very heavy which indicates a powerful motor and compressor. However the buttons on the control panel are cheap and very basic and the lid is a bit troublesome to get on and off. So for me the build quality is OK but nothing special.
Having said that, the gap between the dasher blades and the sides of the bowl is really small. And when it comes to the quality of the final ice cream this is the sort of thing that makes a difference. And many people will agree that the quality of the final ice cream is far more important than the lid or the buttons!
Using the Cuisinart ICE-100 to make ice cream
Just like every other domestic ice cream machine, there's 5 stages to making ice cream with the Cuisinart ICE-100. Don't worry though, they're all pretty simple...
- Make the ice cream mixture
- Pre-cool the ice cream maker
- Churn and freeze the mixture in the Cuisinart ICE-100
- Transfer the finished ice cream to your freezer to harden
- Clean the ICE-100
Step 1: Make the mixture
Now depending on the recipe you're using, this could be done several hours (or even a day) in advance, or it could be done while you're pre-cooling the machine.
Some recipes require you to cook the mixture. I'm thinking of recipes with eggs, cornflour, or any thickener than requires heating to activate. In this case, you'll need to cool the final mixture before you put it in the machine and this can take several hours. These recipes will also benefit from "ageing" in the fridge overnight.
Other recipes don't need cooking. I'm thinking more of Philadelphia and other no-cook ices here. As long as the ingredients are at fridge temperature, once the mixture is made, it can go straight in the ice cream maker.
Top Tip
To make your ice cream smoother, get your ice cream mixture as cold as possible before you add it to the machine. Fridge temperature is good. But sometimes I also put it in the freezer for half an hour, giving it a quick blitz with a blender to break up any ice crystals before it goes in the machine.
But you can't just throw any combination of milk, cream and sugar into the machine and expect it to churn out great ice cream. Ice cream is an extremely delicate combination of 3 states: solid, liquid and gas. And these states must be perfect balance or it just won't work.
Obviously inventing your own recipes and tweaking others to meet your own preferences is one of the best things about owning your own ice cream maker! But when you're starting off with a new machine, I'd urge you to use tried and tested recipes to start with. Such recipes should work every time. And if they don't, then you know there's either a problem with your preparation or with the machine!

The Cuisinart ICE-100 manual
The ICE-100 user manual includes 15 recipes for ice cream, gelato sorbet, frozen yogurt and frozen drinks. This is a good place to start.

The manual comes with 15 recipes
But there are also plenty of fantastic books with loads of recipes that are well suited to these compressor ice cream makers.

This is a great recipe book!
Just remember, the capacity of the ICE-100 bowl is 1.5 quart (1.4 liter). As it's churned and air is added, the mixture will expand. So if you fill the bowl to the top with mixture, eventually it will overflow. Just to be safe, I'd stick to recipes that produce no more than 1 quart of mix.
Once the mixture is prepared (and cooled if it's been cooked), don't forget you want to get it as cold as possible before you put it in the machine. So keep it in the fridge until the ICE-100 is pre-cooled.
Step 2: Pre-cool the Cuisinart ICE-100
You don't have to do this. You could just add the mixture to the ICE-100 and then turn it on. But we know that the faster it freezes, the smoother the final ice cream. And if we add the mixture to a machine that's already cold, it will freeze faster.
There's no special pre-cool function on the ICE-100. You just need to turn it on at least 15 minutes before you add the mixture. Sure, the dasher will be turning in an empty bowl, but that's no problem.
Once you've pressed the Power button, the LCD display should default to 60 minutes. Quickly pressing the Timer button will decrease the timer in 1 minute intervals. While holding the Timer button down will decrease it in 5 minute intervals.
There's no pre-cool function with the ICE-100: just start it up earlier!
I find this functionality a bit clunky. Usually, you'll want to adjust the timer in larger intervals. But if you hold the Timer button down from 60 minutes, it won't go from 60 to 55, 50, 45 etc. It will first go to 59 and then to 54, 49, 44 etc. This is annoying.
You also can't set the Timer for less than 10 minutes. It simply goes back to 60 minutes and you have to cycle down through the temperatures again.
I'm not sure why it couldn't have 2 buttons, one for increasing and another for decreasing the timer. It would make the whole thing a lot more user friendly. However this is a small gripe and you soon get used to the weird way it works.!
Top Tip
Never let the timer reach zero. If you do the compressor will turn off, and even if you turn the machine on again straight away the compressor won't come on for another 2 minutes resulting in lots of warming!
Much more important is the way you do the pre-cool. The most important thing here is that you don't let the timer run down to 0 during the pre-cool. If you do, the machine will turn off and even if you turn it back on straight away, although the dasher will start to turn, the compressor won't start up again for another 2 minutes.
During this time the temperature will rise considerably. For example, I've seen it go from -6°F (-21°C) to 30°F (-1°C) degrees in just 2 minutes. And it will then take another 6 or 7 minutes to get back down to the original temperature. If this happens, pre-cooling was just a waste of time!
It's much better to set the timer to the amount of time you want to to churn the ice cream for plus 15 minutes and then just add the mixture after 15 minutes without ever stopping the machine.
Top Tip
Don't bother with timer. Just leave it at 60 min. Let it run for 15 minutes before you add your mixture. And then only stop the machine to remove the ice cream once you decide it's ready,
Or even better: just leave it at 60 minutes. This gives you 15 minutes of pre-cooling and 45 minutes of churning which should be more than enough. You certainly don't have to wait for the timer to reach zero to extract your ice cream. When you think it's done just stop the machine!
In my experience, the compressor is able to chill the bowl down to around -15°F (-26°C). However to be sure it get's there on the pre-cool you might want to give it 20 minutes rather than 15.
Step 3: Churn and freeze the mixture in the Cuisinart ICE-100
So you've cooled your mixture down to 39°F (4°C) in the fridge. And you've pre-cooled the ice cream maker. Now it's time to make some ice cream!
As I've already said: there's no fancy features on the ICE-100. If you need to reset the timer, press the Start / Stop button to make the adjustments (annoyingly, you can't increase the timer while the machine is churning). Then just remove the lid and pour the mixture into the bowl.
It's worth mentioning here that all domestic ice cream makers are loud. Some people claim they're unbearably loud! The Cuisinart ICE-100 runs at about 71 db which is no louder than a hair dryer. You're probably not going to enjoy watching TV in the same room while it's on! But I don't think it's too bad.
How long it takes to make your ice cream will depend on a whole load of different factors including the recipe, the room temperature, and the temperatures of your mixture and the machine when you added one to the other.
But it's important that you realize that your ice cream will never get to the same consistency as the shop bought stuff while it's in the machine. In fact it's never going to get any harder than soft serve ice cream.

When it get's to soft serve consistency, it's done!
And once it's starting to look like soft serve ice cream or whipped cream and is pulling away from the edge of the bowl, it's probably done. You can also check the temperature. If the ice cream in the middle of the bowl is down to around 21°F (-6°C), it's done.
If you think the ice cream is finished before the timer reaches zero, you can just hit the Start / Pause button to stop the churning and remove the dessert.
Be aware: when the timer reaches zero, the paddle will stop turning and the compressor will turn off. If the ice cream isn't ready yet and you restart the machine with more time, even if you're super quick, the compressor won't come back on again for some minutes. And during this time there can be a lot of melting.
You want to avoid this, so if you can see the timer is nearing zero and the ice cream clearly needs more time, pause the cycle with the Start / Stop button, use the Timer button to add more time and then resume churning.
The ICE-100 does feature a very basic "keep-cool" function. Ten minutes after the timer has reached zero and the machine has turned off, the compressor will start up again for a further ten minutes. The idea is that this will reverse the melting that has occurred during the previous 10 minutes.
I suppose this is useful in case you've slightly miss timed things and you're not there when it finishes. Generally you should try and avoid using this though as a lot of melting can occur in 10 minutes and re-freezing melted ice cream will definitely compromise the quality.
Step 4: Transfer the ice cream to the freezer to firm up
You can eat the ice cream straight from the machine. And it'll taste great! But unfortunately it's not properly frozen yet and will melt incredibly quickly. If you can control yourself, it's a much better idea to pop it in the freezer for a couple of hours to firm up.
Exactly how long it needs in the freezer will depend on the recipe, how cold your freezer is and how you like your ice cream! I would say check after a couple of hours and then again at hourly intervals.
The more melting that occurs in the process of transferring the ice cream to the freezer, the bigger the ice crystals as it re-freezes and the coarser the final ice cream. So we want to limit any melting by doing it quickly and using pre-chilled equipment.

Get the ice cream out of the machine and into the freezer as fast as possible
I like to use wide, shallow, glass or metal containers to store my ice creams. I pre-chill them in the freezer so they're already super cold when I add the ice cream and the glass or metal will transfer that coldness to the ice cream, reducing melting. Using wide, shallow containers also means the ice cream is spread out thinly and this speeds up the freezing process in the freezer.
You just need to get the lid off the machine, pull the bowl out of the cavity using the metal handle, remove the paddle and get scraping with a plastic or wooden spatula. And the quicker the better! Once all the ice cream's in the container, place a piece of cling film or baking paper on the surface of the dessert. This helps prevent coarse ice crystals forming.

A layer of cling film stops ice crystals developing on the surface of the ice cream
Then wack it in the coldest part of the freezer (which is usually the back) and wait. Now for the most fun part of the whole process...
Step 5: Clean the Cuisinart ICE-100
Luckily this is actually very easy. The body of the ICE-100 usually just needs a quick wipe with a wet cloth. If there's any mixture in the chamber, wait until it's melted and then clean with warm, soapy water.
The paddle, the lid and the bowl can be cleaned very quickly in the sink, again with warm soapy water. Unlike the bowls that you put in the freezer, the bowls from compressor ice cream makers reach room temperature very quickly, so any residual ice cream melts almost straight away and they're much easier to clean.
None of the parts are dishwasher safe but they're so easy to clean in the sink it's not an issue.
Final thoughts on Usability
I don't think a huge amount of thought or effort has gone into making the Cuisinart ICE-100 a user friendly experience! The buttons feel cheap and are not very nice to use. The timer can only be changed in one direction. The timer can't be changed at all while the machine is running. And the lid is sometimes difficult to get on and off.
For sure these are relatively small issues. And you soon get used to these quirks. But the ICE-100 isn't a cheap machine. And you'd think a big company like Cuisinart would put a little more effort into the usability of their appliances!
How good is the ice cream from the Cuisinart ICE-100?
As always, this is probably the most important question. And the answer is: it's very good indeed! And not only the ice cream. The ICE-100 can also make great sorbet, gelato and frozen yogurt.
The compressor is able to reduce the temperature of the bowl to a very respectable -15°F (-26°C). But in my opinion it's the very small gap between the dasher and the bowl walls that enables the ICE-100 to freeze the ice cream a little bit faster than other ice cream makers and produce a slightly smoother final product.
But what about the 2 different dashers? Is there a difference between gelato made with the ice cream dasher and gelato made with the gelato paddle? Let's have a closer look...
The gelato dasher vs the ice cream dasher
First of all we need to be clear about how ice cream and gelato differ. There are in fact 3 main differences:
- Gelato contains less fat (< 10%)
- Gelato contains less air (< 40%)
- Gelato is served slightly warmer (12 degrees)
Now, the ice cream maker is only able to influence the second difference here (through the amount of air it introduces to the mixture). The other differences are down to the decisions we make regarding our recipe and serving temperature!
And the shape of the dasher can certainly influence the amount of air that's whipped into the mixture. But the speed of the dasher is probably even more important. And in domestic machines the dashers spin so slowly, that they all incorporate very little air regardless of the dasher design.
By the way, the amount of air in ice cream is also called the overrun. This is measured as a percentage. For example, if you start off with 1 quart of ice cream mixture and once it's churned you have 1.5 quarts, since the air has increased it's volume by 50%, we say it has a 50% overrun.
Apart from the Breville Smart Scoop and the KitchenAid ice cream attachment, all of the machines I've tested produce ice cream with less than 50% overrun, even when used with high fat recipes that allow more air to be whipped into them.
Less than 50% overrun is already close to gelato territory. And you can further reduce the overrun simply by removing the ice cream from the machine slightly earlier. A lot of the air is added in the last minutes of churning, so just a few minutes can make a big difference.
So what I'm saying is: all domestic ice cream makers can make gelato! You don't need a special paddle or a gelato setting on your ice cream maker. You just need the right recipe the right extraction time and the right serving temperature!
The two dashers allow much greater control over the air in your ice cream
Having said all that, it would be really nice if we could vary the overrun in our ice creams by using different paddles. Because it would make it easier and we should be able to get more variation. And the ICE-100 gives us that opportunity!
Different experiments have yielded different results. But my most recent attempts using my no-cook base recipe, produced ice creams with 19% overrun using the gelato paddle and 36% overrun with the ice cream paddle. So it does definitely work!
To be honest both of these ice creams are in gelato territory. But it's a really useful way to play with the consistencies and using the gelato paddle with sorbets will prevent too much air being added which is a very common problem!
Wrapping up
I think the Cuisinart ICE-100 makes some of the best ice creams I've had from a compressor machine. However it won't be the right ice cream maker for everyone. So to help you decide if it's the best machine for you, here's 2 things I love and 4 things I'm not so keen on.
By the way you might think that only 2 things I love and 4 things I don't like means I'm not such a big fan of the ICE-100. That's not the case at all: jump to the conclusion to find out why.
2 things I love about the Cuisinart ICE-100
1. It makes really good ice cream!
The ICE-100 does seem to make slightly smoother ice cream than some machines (like the Smart Scoop). I put this down to the smaller gap between the dasher and the sides of the bowls and possibly the different dasher design.
2. The 3 year warranty!
I think the ICE-100 is the only compressor ice cream maker with a 3 year warranty. All the other I've looked at have 1 year warranties. This is important as compressors are delicate and it's not unknown for them to stop working properly. A 3 year warranty gives you peace of mind.
4 things I don't like about the Cuisinart ICE-100
1. The controls are a bit clunky
With such limited functionality (Power, Start/Stop, Timer), you'd think the interface would be straightforward to use. But setting the timer is a pain. Before you start the machine, you can only adjust it downwards. You can't adjust it at all while the machine is running. And when the machine is paused, you can only increase it. The way it handles larger, 5 minute timer adjustments is also annoying.
2. The compressor automatically stops when the timer reaches zero
Whether you're pre-cooling or churning, if the timer reaches zero, the ICE-100 will turn off automatically. The paddle stops spinning and the compressor stops cooling. And even if you start it up again immediately, it will take a couple of minutes before the compressor comes on again.
So anything that's already in the bowl or that you add to bowl, will be warming up for the next 6 minutes (which is more or less how long it will take to get back to the temperature it was at when it stopped). This slows down freezing and can lead to coarser ice creams so should be avoided.
3. The keep-cool function is useless
Once the timer reaches zero, the machine stops. The compressor will stay off for 10 minutes and then come on for another 10 minutes before finally going off for good. I think the idea is that this will keep your ice cream at the final consistency for 20 minutes.
But in fact, what happens is that it melts for 10 minutes and then re-freezes for 10 minutes. Because it's based on time, the degree of melting will vary according to the temperature of the room. This is not good news for the ice cream and again it should be avoided!
4. Sometimes it's hard to lock the lid
For some reason I find it difficult to get the lid into the locked position. I press it down and turn it but sometimes it just doesn't catch properly.
Alternatives to the Cuisinart ICE-100
If you're thinking the ICE-100 is probably not the best ice cream maker for you, then fear not! Because there's loads of alternatives, and I look at 2 other choices below...
Looking for more convenience?
One of the main drawbacks of the ice cream makers with compressors is that they’re quite big, bulky and heavy. Which means they’re not very countertop friendly, unless you have a massive kitchen!
Mine certainly won’t fit in my kitchen. So I have to keep them stored away and bring them out every time I want to make ice cream. This becomes annoying, and I almost certainly don’t make ice cream as often as I would if I had a machine permanently on my kitchen worktop.
The ICE-100 is no exception to this rule.
The Ninja Creami, on the other hand, is a tall, thin, relatively lightweight appliance that is not dissimilar in form to a blender. And it will fit on most kitchen worktops, just like a blender. In fact, mine sits comfortably next to my Vitamix.

My Ninja Creami sits comfortably on my countertop (next to the Vitamix)
But the convenience doesn’t end there! Unlike other machines, with the Ninja Creami, the ice cream comes out firm enough to eat immediately. So, as long as you have a frozen mixture in the freezer, when the urge grabs you, you can be eating perfect ice cream within 2 minutes.
Because the Ninja Creami works differently to regular domestic ice cream makers, it’s worth doing a bit more research. Read my full hands-on review of the Ninja Cream, or my head-to-head comparison between the Ninja Cream and the Cuisinart ICE-100 and ICE-21.
Looking for something cheaper?
The Cuisinart ICE-100 is a very reasonably priced ice cream maker, especially if you consider the 3 year warranty! However, if you can't stretch that far, there are compressor machines with cheaper price tags.

One of the least expensive is the Knox Gear Automatic Ice Cream Maker. The Knox is a compressor machine with the same 1.5 quart capacity as the ICE-100.
Its control panel is much more user friendly than the one on the ICE-100. The timer can be adjusted upwards or downwards with 2 different buttons! And the LCD display also shows the current temperature which I always find useful.
Just like the ICE-100, there's no automatic pre-cool function, so you'll need to do it manually. But while the primitive keep cool function works on the same 10 minute cycle as the ICE-100, while the Cuisinart machine stops after 1 cycle, the Knox will keep turning on and off for 10 minute periods for up to an hour.
However because it's based on time (rather than consistency like the Smart Scoop), this sort of keep-cool function is unlikely to work very well and will almost certainly result in excessive melting and re-freezing that will produce coarse ice cream. I don't recommend it!
Unlike the ICE-100, the Knox machine only has a 1 year warranty. This is standard for most ice cream makers, but since Knox is a pretty much unknown company and there have been a few reliability issues reported on Amazon, this is my big concern about this machine.
For sure, it's a fair bit cheaper than the ICE-100, but is that saving worth investing in a machine that only has a 1 year warranty and has some doubts about it's build quality?
Looking for something that's more user friendly?
The ICE-100 isn't unfriendly! It's just that it has very basic functionality and the controls are a little cumbersome.

The Breville Smart Scoop is the easiest ice cream maker to use!
If you want more features and a better user interface, then how about the Breville Smart Scoop? Again, the Smart Scoop is a compressor machine with a 1.5 quart capacity.
But it has a whole load more features and is better suited to people that like automatic settings, as it will pretty much "hold your hand" throughout the whole ice cream making process.
For example pre-cooling is automatic: simply press the button and the Smart Scoop will start to cool down, altering you when it has reached the optimum temperature and it's time to add your mixture.
In automatic mode you can choose from 12 different hardness settings according to the type of dessert you want to make. The Smart Scoop will then churn the mixture until it reaches the desired consistency. You don't have to watch it. You don't have to worry about anything!
Once your ice cream is finished the Smart Scoop will enter a "keep cool" mode that's much more advanced than the one you get with the ICE-100. That's because it's actually based on consistency rather than time. The Smart Scoop is able to monitor the consistency of the ice cream and determine whether it needs to start freezing and churning again. This should significantly reduce the amount of melting that occurs in the keep cool mode and result in smoother ice cream.
There are some drawbacks to the Smart Scoop however. It's more expensive than the ICE-100. It only comes with a 1 year warranty. And most importantly, I the ice cream it makes is not as smooth as the stuff from the ICE-100. Read my full review of the Breville Smart Scoop here.
Conclusion
I really like the Cuisinart ICE-100 [Amazon]. For sure, there are more things I'm not so keen on than I love! But the things I'm not so keen on are minor gripes...
You get used to the clunky control panel pretty quickly. You can avoid the compressor turning off when you don't want it to. It doesn't really matter if the lid is locked or not. And (except in the Smart Scoop) a keep cool mode is always useless anyway.
The big things, the things that are really important, those are the things that the Cuisinart ICE-100 get's right. It makes better ice cream than almost every other compressor machine I've tested. And you get a nice 3 year warranty (5 years in the UK!).
So in conclusion: you can buy the ICE-100 [Amazon] in the utmost confidence. Confidence that it will make some of the best quality ice cream. And confidence that if you have any problems in the next 3 or 5 years, Cuisinart will have to sort them out!
Cuisinart ICE-100 Specs | |
|---|---|
Width: | 12" |
Height: | 9.5" |
Depth: | 17" |
Weight: | 32 lb |
Loudness: | 71 Db |
Paddle Rpm: | 25 |
Overrun: | 19-36% |
Warranty: | 3/5 year |
Manual: | |
My Ratings |
|---|
Build Quality |
Usability |
Ice Cream Quality |
Value for money |
Overall |
Things I like and Things I don't |
|---|


